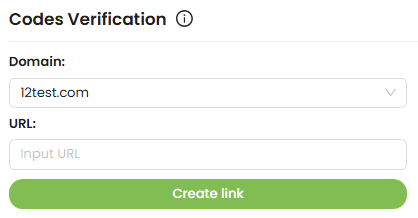
Codes & Verification

  • JavaScript Code Installation

    JavaScript code example

    Select a Pixel Display Option

    Before adding the code, you must choose a pixel display option — this step is required because the generated code depends on the selected option. The default option is a 1px pixel, which will be invisible on the website. If you want the pixel to have a visible image in the footer of the site, switch the selection to the appropriate option.
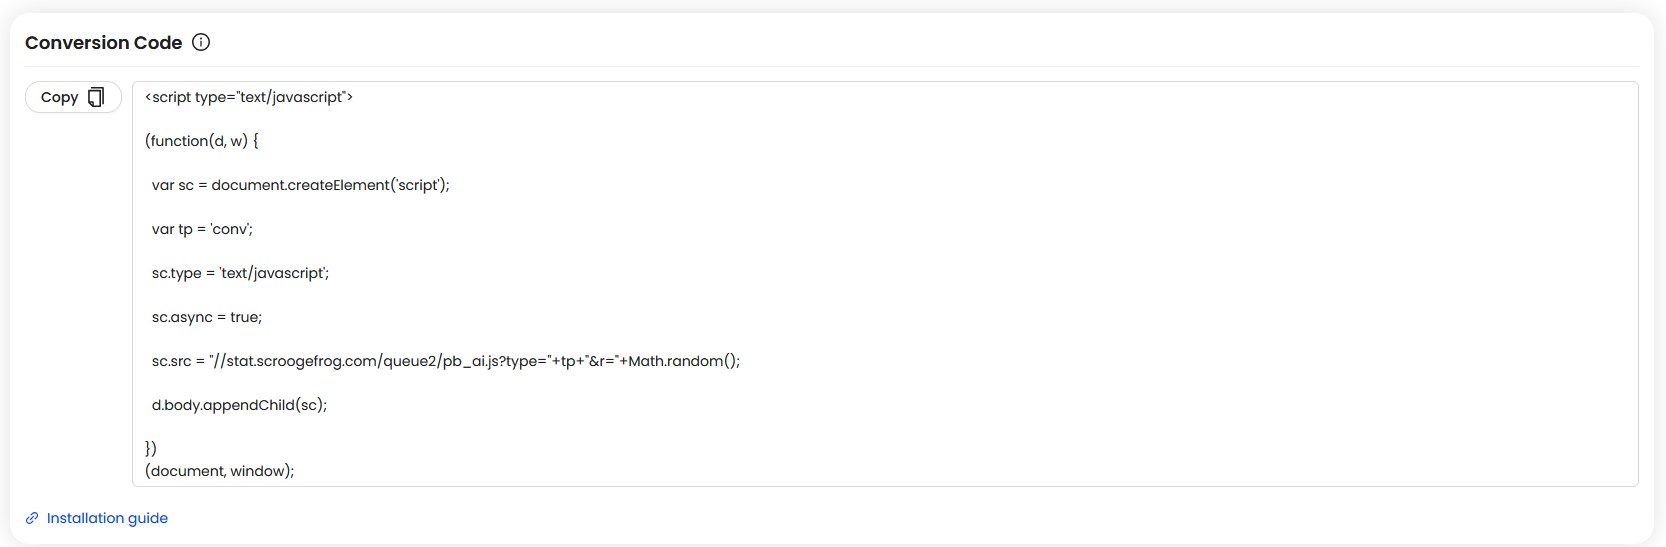
    Copy the Code

    Go to the Codes section and select JavaScript Code. Copy the entire code snippet provided there. If you manage multiple websites, you can use the same code across all of them.

    Add the Code to Your Site

    Insert the copied JavaScript code into your website’s HTML, right before the closing tag. You can add it to:

    • The entire website — to track all pages
    • Specific landing pages — if you only want to track selected URLs

    For optimal analysis, we recommend installing the code site-wide to collect complete data about user actions.

    Verify the Installation

    After inserting the code, make sure it’s correctly installed and active.

    Enter your domain into the verification field and click Verify. The system will confirm whether the script is functioning properly.

  • How can I set up my Conversion Code or Postback?

    Add Conversion Code:

    This code is used to track conversions (e.g. successful registration, purchase, form submission). All collected data is encrypted and sent to train an AI model to improve fraud detection accuracy.

    Where to Place the Code?

    The code must be placed on a target event. It is usually added to a confirmation page or called after a successful user action (e.g. redirect to a "Thank you" or "Success" page).

    Insert the code inside the website's tag, just before the closing tag.

    How to Get the Code

    Go to the Codes section and select Conversions Code. Then copy the JavaScript snippet provided there.

    Example Code:

    Conversion Code Example

    Once the code is placed and a conversion occurs, the system will automatically record it.

    About Postback setup:


    A Postback allows your website or tracking system to automatically send conversion data back to the platform when an event (like a signup or purchase) happens. This ensures precise tracking even if cookies are blocked or expired.

    When setting up your Postback or Conversion Code, make sure the following parameters are included:

    • click_id — this should be passed from the URL parameter or retrieved from the gclid (or similar) cookie on your website at the time of conversion.
    • domain — the hostname of your website from which the conversion event is sent.

    Once everything is in place, perform a test conversion to confirm that your Postback or Conversion Code is firing correctly. If set up properly, your conversions will appear automatically in the dashboard.

  • (Optional) PHP server-side code for setting up UDP or TCP tracking on all pages of the site or specific landing pages.

    To do this, go to CodesServer Code and download the required file.

    The code must be placed in the root directory of your website. This is an additional mechanism to capture even non-loaded transitions.

    Depending on the protocol used — UDP or TCP — unzip the archive and place the file in the appropriate directory.

    Server Code Verification

    After installation, you must complete verification to ensure the server code is properly installed and functioning.

    Example:
    www/your_site_directory/scroogefrog_tcp.php — where scroogefrog_tcp.php is the file used for the TCP protocol. Then click Check.

  • How can I check if my tracking codes are installed correctly?

    To verify that your tracking codes are working properly, follow these simple steps:

    1. Go to the Codes Verification tab in your dashboard.
    2. Select your Domain — the one where the tracking codes are placed.
    3. Enter the full URL of your domain.
    4. Click “Create link.”
    5. Open the verification link that appears in the list below and perform a conversion (for example, make a test signup or purchase).

    If everything is set up correctly, you’ll see a green confirmation next to each code under your domain in the table. This means all your tracking codes are active and verified.