Module settings
-
Plugged Modules
A list of all modules with the ability to access settings and statistics.
Display of module limits. Here you see the module limits in numbers according to the size of the Subscription plan you have chosen and the current usage level of your plan. You can see your subscription limit in the Finances section in the Subscription category, where your current plan is displayed.
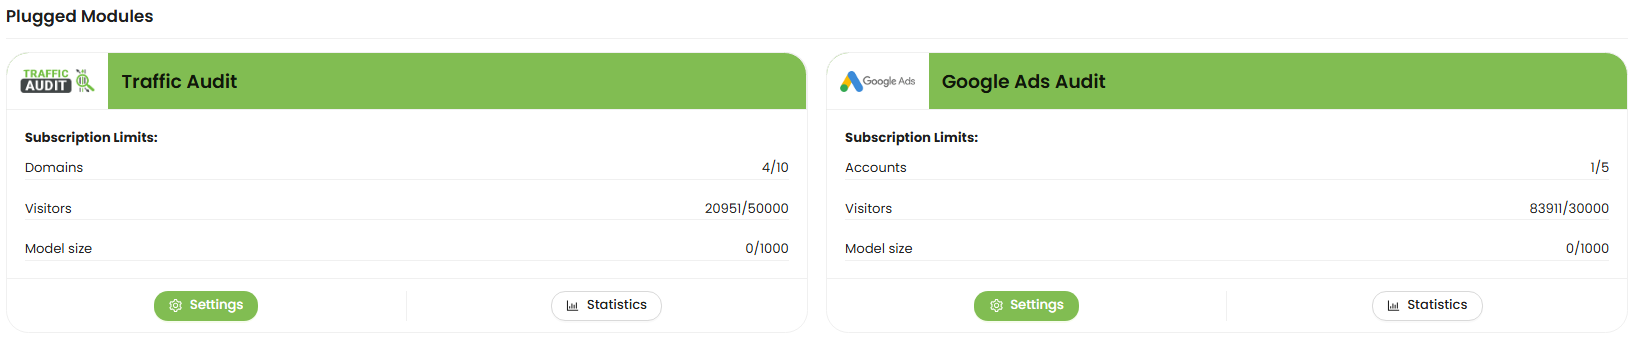
It is also possible to deactivate the module here.
Unplugged Modules
This displays modules that are deactivated or not yet connected to the system. We are waiting for the development and connection of the following modules:

TikTok Ads
Facebook Ads
-
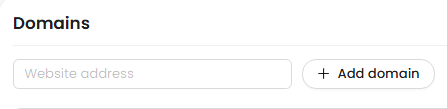 Domains ( website address) +Add domain
To add a website domain to the module - enter its address in the Domain field and click Add domain.
Below is a list of domains in this module. Here you can also remove any domain from the analysis list in the module, or delete the domain from the system permanently by clicking the corresponding button.
 - Remove from module or Delete domain
Domain & Module settings
Next, you need to configure the settings for your domains in this module.Domain settings
First you need to select a domain in the "select domain" field. Then you go to the domain settings and select all Tracking parameters that you need to track. You can select the parameters from the standard parameters list and click "save" to fix them for the next tracking.Standard parameters:
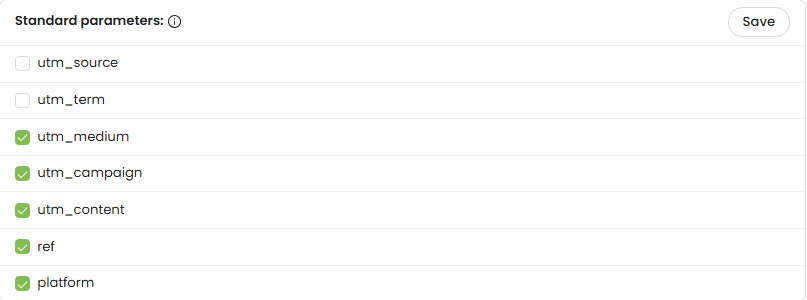
- utm_source
- utm_term
- utm_medium
- utm_campaign
- utm_content
- ref
- platform
- Domain:
- Activity range:
- Save settings
-
Verified Sites
These are traffic sources with a proven track record of delivering high-quality, non-fraudulent traffic. They have a stable reputation and do not generate bot activity or suspicious clicks. -
SEO Whitelist
This is a list of domains that have passed SEO quality checks — they receive real organic traffic, have strong reputational metrics, and show consistent, trustworthy performance. -
Your Own Resources
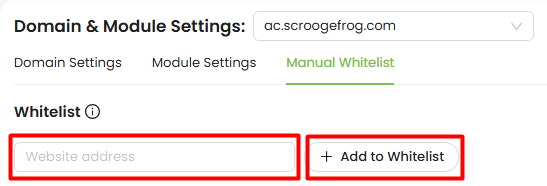
These are websites, landing pages, blogs, or other online assets owned by you or your business. Since you control these properties, their safety, quality, and traffic transparency are fully guaranteed. - Enter the domain (e.g., partner.example.com) in the “Website address” input field.
- Click the “Add to whitelist” button.
- The domain will appear in the whitelist table below.
- ID – Internal reference number
- Domain – The domain name you've added
- Created at – Timestamp of when the domain was whitelisted
- Action – Ability to remove the domain
- Find it in the whitelist table.
- Click the “Delete” button in the corresponding row.
- The resource will be removed, and tracking will resume for that domain or IP. Note:
Or you may add up to 5 additional custom ones for your module. To do this, you need to click the "add parameter" button.
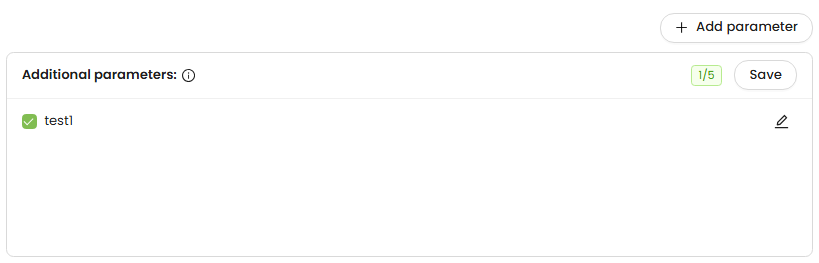 Additional parameters: +Add parameter ( available max 5)
Module settings
Next, you go to the module settings. Here you see the domain you selected and can set the analysis period for this domain, according to the duration of your advertising campaign. To do this, go to the calendar and select first the analysis start date and then the analysis end date for this module. After these settings, click the "save settings" button.
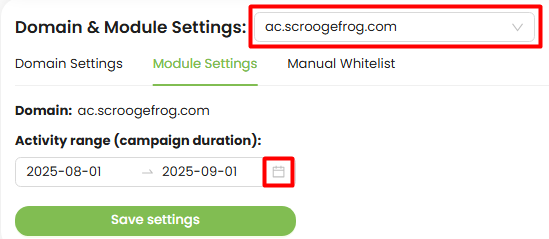
These actions with setting the parameters and analysis period must be done for each domain added to your module.
The User Whitelist feature allows you to exclude specific domains or IP addresses from being tracked by our system. Any whitelisted resources will not count against your usage limits. This is especially helpful if your site is integrated with third-party services (e.g. Verified Sites, SEO Whitelist, Your Own Resources) that may otherwise artificially inflate your traffic or usage metrics.
What Are “Verified Sources” and Why Are They Important?
Verified or trusted traffic sources are links, websites, or platforms that are known to be safe, high-quality, and free from fraud. These sources already have a positive history and help ensure that the traffic sent to your campaigns is real and reliable.
Here’s what each category means:
Using trusted sources helps protect your budget, improve campaign performance, and reduce the risk of fraudulent or low-quality traffic.
How to Add a Resource to the Whitelist

Once added, traffic from this domain or IP will be ignored by the platform and won’t affect your account statistics or billing.
Manage Your Whitelisted Resources
Each whitelisted item will display the following:
How to Remove a Resource
To remove a domain or IP:Use this feature carefully. Excluding important domains could result in incomplete data reporting. If you have multiple websites or integrations, whitelisting trusted internal domains ensures that your usage metrics remain accurate and billing is fair.
-
Setting Up the Google Ads Audit Module
Follow these steps to quickly connect and configure your Google Ads Audit module:
-
Connect Your Google Ads Account
Start by entering your Google Ads account in the field provided and click “Add Account”.
If the account doesn’t connect right away, simply click “Synchronize” again — sometimes it may take an extra try.
 When prompted, confirm the sync in the Google Ads pop-up. Once confirmed, your main ad account will automatically link to our system.
Data loading typically takes only a few seconds. -
Select Your Domain
Now move on to the configuration tabs below. First, select the domain you want to work with.
-
Choose the Account in “Account Settings”
Go to the “Account Settings” sub-tab and choose which linked account you’d like to analyze in this module.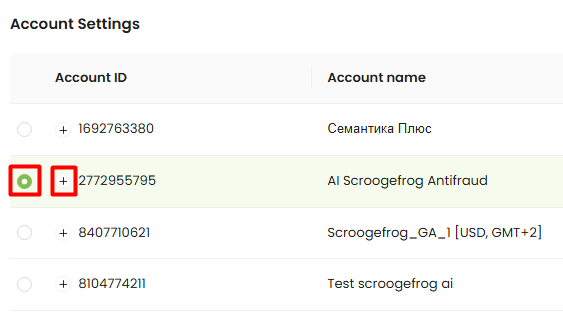
-
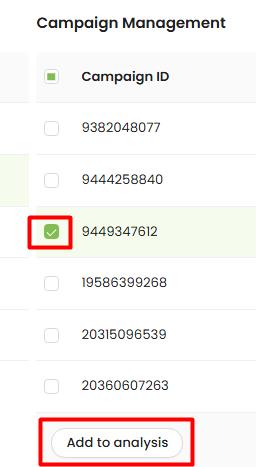
Add to analysis
You’ll now see a list of all your Google Ads campaigns.
Select the campaigns you want to include in this module, then click “Add to analysis” to link them.
 After that, proceed to the “Module Settings” tab.
-
Set Domain & Campaign Dates
Select your domain and set the active date range for this module.
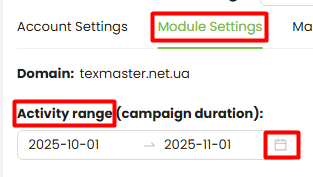 This ensures that the module automatically stops analyzing traffic when the campaign ends — helping you manage your subscription limits more efficiently.
-
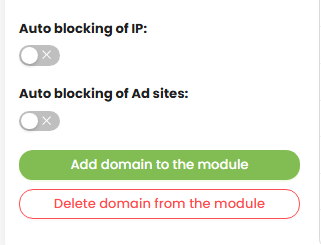
Enable Automatic Blocking (Optional)
For easier optimization, you can enable or disable:- Automatic IP blocking – blocks fraudulent IPs at the Google Ads campaign level.
- Automatic site-level blocking – blocks low-quality traffic sources to save your ad budget.
-
Use Standard Tracking Parameters
You can apply our default tracking parameters to quickly and accurately group traffic.
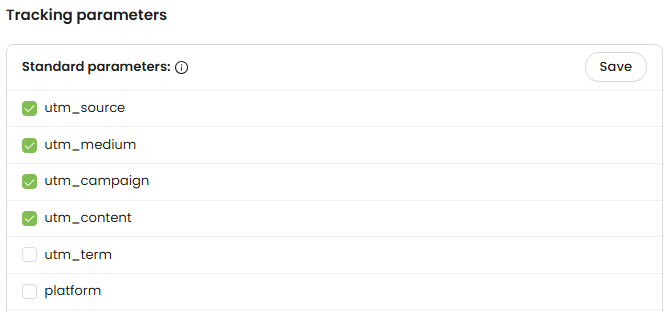 This makes your reports and analysis more organized and easier to read.
-
Add Custom Tracking Parameters (Optional)
If you prefer, you can enter and save your own 5 custom tracking parameters for campaign traffic.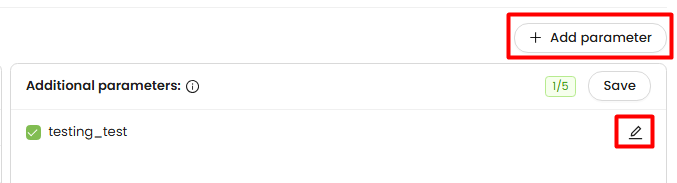
-
Save Settings
Click “Add Domain to the Module” to save your settings.
-
Manual Blacklists (Optional)
What Is the Manual Blacklist and How Does It Work?
The Manual Blacklist allows you to manually add specific IP addresses or domains that you want to block in Google Ads. This is useful when you already know which sources consistently send fraudulent or low-quality traffic.
How it differs from the automatic blacklist:
- Automatic Blacklist Generated by the module based on detected fraud signals. It updates automatically as the system analyzes your traffic.
- Manual Blacklist You control it. If you know certain websites or IP addresses always send bad traffic, you can add them manually so they are blocked immediately and permanently.
Everything you add manually is always included when the module sends block requests to Google Ads — whether it’s for IP addresses or domains (placements) in the Google Display Network.
Blacklist Limits in Google Ads
Google Ads has a limit of 500 entries per campaign. Once that limit is reached, the system automatically begins overwriting the oldest items in the automatic blacklist to make room for new ones.
Why the manual blacklist is important:
- Manually added entries are protected — they do not get overwritten when automatic updates happen.
- If you know certain sites or users should never see your ads, adding them manually ensures they remain permanently blocked.
- This helps you keep full control over critical exclusions even when the automatic list rotates due to the 500-item limit.
Using the manual blacklist ensures that your most important exclusions stay intact and your Google Ads budget is protected from known fraudulent sources.
Simply select the account, domain, and campaign where you’d like to block fraudulent IPs.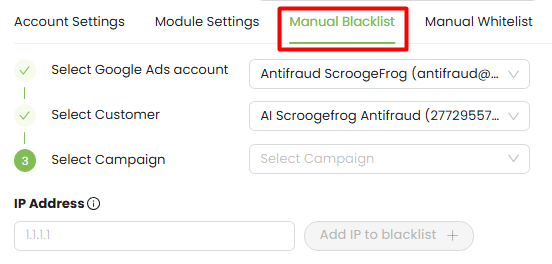 After that, the Blacklist will be displayed in the table below.
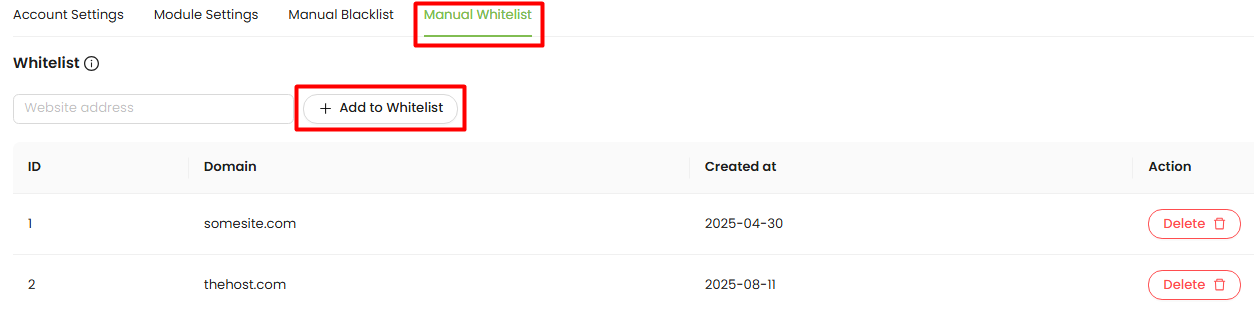
Manual Whitelist (Optional)
What Is the Manual Whitelist and Why Is It Important?
The Manual Whitelist is used to specify domains or IP addresses that should never be blocked in Google Ads — even if the system detects suspicious or unusual activity from them.
While the module automatically builds a blacklist of fraudulent sources and sends those items to Google Ads for blocking (IP addresses or placements in the Display Network), you also have the option to add your own items to the manual blacklist if you know certain sources are always fraudulent.
However, if there are domains or IPs that you definitely want to protect from being blocked, you should add them to the Manual Whitelist.
How the Whitelist Works in Google Ads ?
All domains and IP addresses added to the whitelist:
- are always excluded from the automatic blacklist,
- are ignored when manual blocking rules apply,
- are never sent to Google Ads as blockable items,
- do not affect fraud statistics and do not reduce traffic quality scores,
- have the highest priority in the system.
This means that if a domain or IP is on your whitelist, it cannot be blocked — even if the automated fraud analysis would normally classify it as risky or suspicious.
Use the manual whitelist to protect trusted partners, internal resources, important ad placements, or any traffic sources you know are always safe.
The User Whitelist feature allows you to exclude specific domains or IP addresses from being tracked by our system. Any whitelisted resources will not count against your usage limits. This is especially helpful if your site is integrated with third-party services (e.g., analytics tools, content delivery platforms) that may otherwise artificially inflate your traffic or usage metrics.
How to Add a Resource to the Whitelist
- Enter the domain (e.g., partner.example.com) in the “Website address” input field.
- Click the “Add to whitelist” button.
- The domain will appear in the whitelist table below.
Once added, traffic from this domain or IP will be ignored by the platform and won’t affect your account statistics or billing.
Manage Your Whitelisted Resources
Each whitelisted item will display the following:
- ID – Internal reference number
- Domain – The domain name you've added
- Created at – Timestamp of when the domain was whitelisted
- Action – Ability to remove the domain
How to Remove a Resource
To remove a domain or IP:- Find it in the whitelist table.
- Click the “Delete” button in the corresponding row.
- The resource will be removed, and tracking will resume for that domain or IP.
Note:Use this feature carefully. Excluding important domains could result in incomplete data reporting. If you have multiple websites or integrations, whitelisting trusted internal domains ensures that your usage metrics remain accurate and billing is fair.
-
You can create a new AI model every two weeks, and if the domain has more than 100 conversions.
A custom model can be created after a certain period — specifically, after collecting more than 10,000 requests and 100 conversions.
Select the required domain.
After that, you have the option to either use our default model or train your own custom model based on your data.Create custom model
- Click on Select Domain and choose one.
- After that, you have to write a Model name.
- Then toggle the switch Active to ON
- After that, click Create. (photo) Domain:( Select domain) Model name: Active: Create
AI Models
Here you can see all your active custom AI models and all the information about them. To do this, select a domain from the list in the "Select domain" field and in the table below you will see your custom AI model created for this domain. Also in the table you will see basic data about this model, such as: its name, size on the server, creation date and current status.
-
Connect Your Google Ads Account